This routine creates 3D contour lines from 3D points.
It was written for Autocad 2000, so there's no guarantee it will work for your version.
BricsCAD supports any version. Download a free BricsCAD trial here..
See CTM Lisp Notes below
-------------------------------------
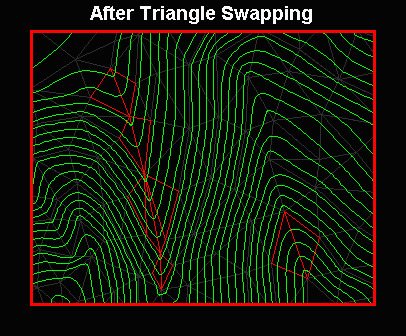
Unzip files to /support directory or any directory in program search path. Type (load"ctl_c1") at the command prompt to load routine. Type "CTL" at the command prompt for option list. Command: CTL 1. Read/Write CSV Point File. 2. Draw Triangulated Surface. 3. Draw Contour Lines <0.2 min>. 4. Color Contours/Objects. 5. Annotate Contours. 6. Cross Sections from Contours. 7. Area Calculations. 8. Swap Triangle Pairs. |
  Option 1  imports any xyz comma separated point file onto layer "CTL_PNT" or writes any selected points
on layer "CTL_PNT" or "CTL_PTMP" to a comma separated point file and deletes all selected points from the drawing.
If you read a file, it will erase any existing points on layer "CTL_PTMP" and change any existing points on layer
"CTL_PNT" to layer "CTL_PTMP.  The point files can have white spaces, but no tab characters or blank lines.


    Option 2 creates a triangulated surface from all points found on layer "CTL_PNT".  It will prompt
  you to check for duplicate points.  It can take a while to check if you have thousands of points,
but the program will hang if you don't delete them first.

   Option 2 calculates all triangle points and takes an average of all long side horizontal lengths.
 You can ignore this value and create all triangles, or enter a factor to delete any triangle with
 sides longer than the average times a factor from 1.5 to 5.0.  You can either ignore this option
 or use it to delete most of the extraneous triangle faces that shouldn't be there.  It always deletes
 any previous triangles, so can keep trying different factors to get the surface the the way you want.
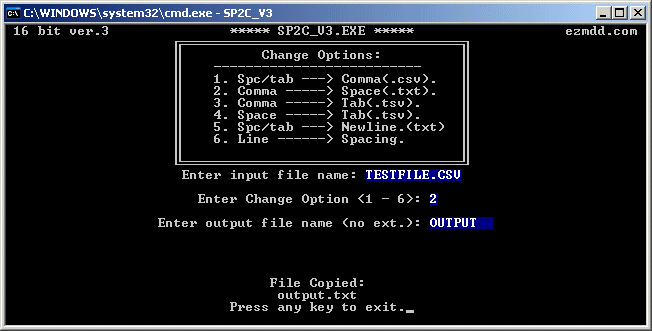
If you need to change a space separated point file to a comma separated file, try one of these command line programs.
32 bit version s2csv4.exe (142,848 bytes) or 16 bit version sp2c_v3.exe. (18,600 bytes) (8 char file names only.)
Option 3 creates contours by drawing plines thru each triangle surface on temporary layers. It selects all lines on each elevation, joins them and asks if you want to create spline fit curves. Spline curves take up a huge amount of drawing space and lose accuracy on sharp corners if enough points are not supplied. If successfully joined/splined, it changes each contour to layer CTL_CONT and deletes all temporary layers. Option 4 switches to a front view, uses the latest contour spacing with the left and right limits to select and color contours. It uses a crossing window to select the contours, so make sure your drawing limits don't exceed the limits of the objects by some huge distance. If you open a drawing and run this routine before you create any contours, it will check if there's any surface on layer CTL_TIN to find hi and low points. If not, it will ask you to supply both numbers in integer values. Anything above and below what you're coloring will work. It then asks you to pick an entity on the layer you want to color and the vertical spacing you want to use. Option 5 annotates by picking a point on any contour line. It will prompt to either break the contour line or place the text above the line. Drag the cursor to the right to align the text. It will prompt you for a text size so you should check for clearance between contours. It reads the elevation from the pick point so you don't have to type anything. The text is written at that elevation on layer "CTL_CTXT".
If you colored the contours with the Major/Minor option, the major lines should already be on even elevations. 50 unit contours spaced at 5 show up above. A 20 unit contour spaced at 5 will be even 100 units or 40 units spaced at 5 will be 200 unit elevations. Option 6 creates cross sections from contours on layer CTL_CONT. You need to draw a "LINE" over the contours to section. It searches along the section "LINE" with a crossing fence and will prompt you for a fence distance. If the fence is larger than the smallest contour spacing, you could miss some contour points. It will prompt for a starting station if your sections are equally spaced and you want to add stations to your profiles. It only takes integer values. You can always overwrite the default station number and reset the forward spacings. The profiles are drawn in the direction the section line was drawn. If you get it backwards, you can either rotate the section line 180 degrees or just mirror the profile since it's center based.
Option 7 calculates areas by using the boundary command. It uses the pick point as the text location and will prompt for a text size. It temporarily displays a red boundary and prompts you to accept or decline the area shown.
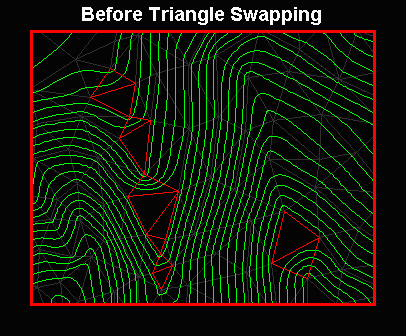
Option 8. You may need to swap triangles to force adjacent sides to run straight down a ridge line or up a valley line. If you swap triangles, the program moves all points on layer "CTL_PNT" to layer "CTL_PTMP". Every time you create a surface with option 1, the program erases any existing surface created on layer "CTL_TIN". The points were moved so you don't accidentally resurface and lose any swapped triangles. Just keep running option 2 until you get the contours the way you want. Option 2 automatically erases any existing contours on layer "CTL_CONT" and re-contours.
Back to Download Page.
Back to Home Page.
These are miscellaneous routines removed from the original file because it had too much fluff, plus some new routines to draw and annotate survey lines. Unzip files to /support directory or any directory in program search path. Type (load"ctl_m1") at the command prompt to load routine. Type "CTM" at the command prompt for option list. Command: CTM CTM Command Options ----------------------------- 1. Overlay Pt Grid on Surface. 2. Quantity from Surface. 3. Replace Individual Pts from file. 4. 3-D Mesh from Pts or Surface. 5. Draw 2-D Survey Traverse Lines. 6. Annotate Survey Lines. 7. Insert Curve Data. 8. Insert Area Quantities. |
Option 1 selects all triangle faces on layer CTL_TIN and overlays an equally spaced
point grid on the face surface.  It erases all existing points on layer CTL_PNT and replaces them
so make sure you have a backup point file!


Option 2 calculates quantities from a triangulated surface relative to a base elevation.
The total surface area must remain constant and you derive the actual volume by the difference
between each surface change.  The example below only shows the need to set the base elev. below
any anticipated excavation elevation. The default base is the lowest triangle point and can
remain unchanged for fill quantities, but the actual volume is still the difference between
surface changes.  This only works on triangulated surfaces.


Option 3 inserts points from an xyz.csv point file one at a time and allows you to
drag a box around any existing nearby points to erase.  This is just an easy way to replace
individual points if you're running incremental quantity surveys with option 2.  After all
points have been inserted, it gives you the option of saving all points as an incremental
backup point file with a (YYYYMODD.csv) default file name or whatever name you want.


  Option 4 creates a 3Dmesh.  It asks whether you want to sample for points or 3D faces.
It prompts for a lower left and upper right point for the mesh boundary, grid spacing, and base
elevation.  You can press "A" or "B" to ignore any points above or below the base elevation. It
selects entities in the drawing with a crossing window the size of each grid spacing and takes
an average of all elevations it finds.  If it finds nothing in a crossing window, it uses the
base elevation. You're limited to 256 x 256 on any one grid.
  Option 5 asks for a start point and draws lines based on direction (NW, NE, SW or SE)
and distance.  You can continue with a new direction, curve left or right (CL or CR).
Curves continue with a tangent line or another curve (L, CR or CL).

  Option 6 annotates by selecting a line/polyline or picking 2 points.

  Option 7 inserts curve data by selecting a curve point near the start end.
It only works on single arc entities and not part of a polyline.


Option 8 calculates areas by using the boundary command.  It uses the pick point as the text
location.  It temporarily displays a red boundary and prompts you to accept or decline the
area shown.  You can display area as acres, square miles, square kilometers, or base units.
Back to Download Page.
Back to Home Page.